Windows users have to face some common issues very often, and WiFi not showing up is one of them. We have received a lot of queries about why is 5G not visible and how to enable it. Therefore, in this article, we will be resolving this issue along with busting some myths. Generally, people face such WiFi related issues when they update the operating system or change the Router settings. Changing the WLAN hardware too causes such WiFi related problems. Apart from these, there are few more reasons such as your computer hardware, or the router may not support the 5G band. In short, there are numerous reasons due to which users can face the given issue in Windows 10.
What is 5GHz WiFi? Why is it preferred over 2.4GHz?
If we put it simple and straight, the 5GHz WiFi band is faster and better than the 2.4GHz band. The 5GHz band is a frequency through which your WiFi broadcasts network. It is less prone to external interference and gives faster speed than the other. When taken to comparison with 2.4GHz band, the 5GHz has an upper limit of 1GBps speed which is 400MBps faster than the 2.4GHz.
What is 5GHz WiFi? Why is it preferred over 2.4GHz? Fix 5GHz WiFi not showing up in Windows 10 1. Check if the system supports 5GHz WiFi Support 2. Check if your Router supports 5GHz 3. Enable the 802.11n mode of the Adapter 4. Manually Set the Bandwidth to 5GHz 5. Update the WiFi Driver (Automatic Process) 6. Update the WiFi Driver (Manual Process) 7. Rollback the Driver Update
An important point to note here is – 5G mobile network and 5GHz band are different. Many people interpret both as the same while the 5th generation mobile network has nothing to do with the 5GHz WiFi band. The best way to solve this problem would be to first identify the cause and then bring out the potential solution. This is exactly what we are going to do in this article.
Fix 5GHz WiFi not showing up in Windows 10
1. Check if the system supports 5GHz WiFi Support
It would be best if we wipe out the primary problem. The first thing is to run a check to see if your PC and router support the 5Ghz band compatibility. Follow the steps to do so:
Search for Command Prompt in the Windows search bar, right-click on the search result, and select Run As Administrator.
Once the command prompt opens, type the given command to check for the wireless Driver properties installed on your PC:
When the results pop up in the window, search for Radio types supported. When you find it, you will have three different networking modes available on the screen:
11g 802.11n: This indicates that your computer can only support the 2.4GHz bandwidth. 11n 802.11g 802.11b: This also indicates that your computer can only support the 2.5GHz bandwidth. 11a 802.11g 802.11n: Now this one shows that your system can support both 2.4GHz and 5GHz bandwidth.
Now, if you have got any of the first two Radio types supported, then you will need to upgrade the adaptor. It is best advised to replace the adaptor with another one that supports the 5GHz. In case you have the third radio type supported, but the 5GHz WiFi does not show up, move on the next step. Also, if your computer does not support the 5.4GHz, the easiest way for you would be to buy an external WiFi adapter.
2. Check if your Router supports 5GHz
This step requires you to do some internet surfing and research. But before you move on to it, if possible, bring the box which had your router. The Router box will have the compatibility information. You can see if it supports 5GHz or not. If you can’t find the box, then it is time for you to go online.
Open the website of your manufacturer website and look for the product which has the same model name as yours. You can check the model name and number of your router mentioned on the Router device. Once you have found the model, check the description, and see if the model is compatible with 5 GHz bandwidth. Generally, the website contains all the description and specification of a device. Now, if your router is compatible with the 5 GHz bandwidth, proceed to the next steps to get rid of “5G not showing up” problem.
3. Enable the 802.11n mode of the Adapter
You, being here at this step, means that your computer or router can support 5 GHz bandwidth. Now, all that left is to fix 5GHz WiFi not showing up in Windows 10 problem. We will start by enabling the 5G band for WiFi on your computer system. Follow the steps given below:
First of all, press the Windows key + X button simultaneously. This will open a list of options.
Select the Device Manager option from the given list.
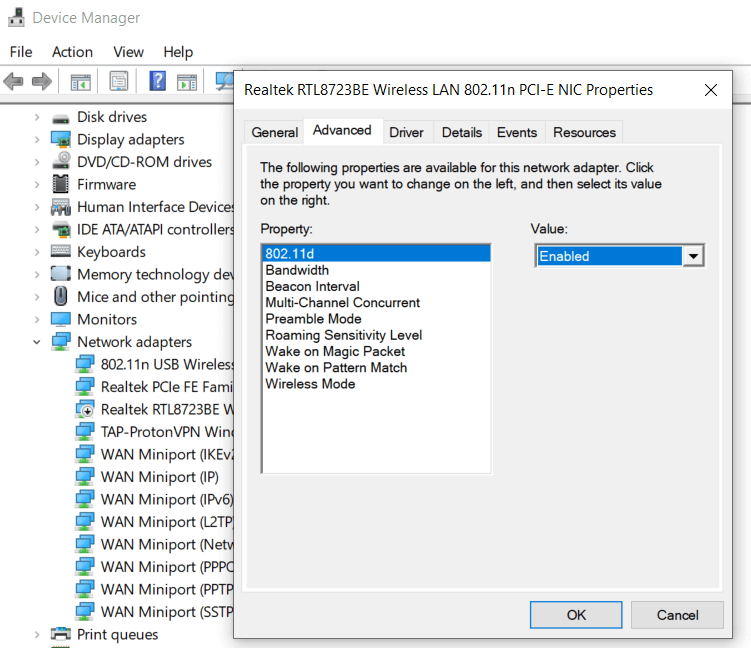
When the device manager window pops up, find the Network Adapters option, when you click on it, the column with expand with a few options.
From the given options, right-click on the Wireless adapter option and then properties.
From the Wireless Adapter Properties window, switch to the Advanced tab and select the 802.11n mode.
The last step is to set the value to Enable and click OK. Now you need to restart your computer to apply the changes made and check if the 5G option is in the Wireless Network connections list. If not, then try the next method to enable 5G WiFi.
4. Manually Set the Bandwidth to 5GHz
If the 5G WiFi doesn’t show up after enabling, then we can set the bandwidth manually to 5GHz. Follow the given steps:
Press the Windows key + X button and select the Device Manager option from the given list of options.
Now from the Network Adapters option, select Wireless Adapter -> Properties.
Switch to the Advanced tab and select the Preferred Band option in the Property box.
Now select the band value to be 5.2 GHz and click OK.
Now restart your computer and see if you can find the 5G WiFi network. If this method does not work for you, then in the further coming methods, you will need to tweak your WiFi driver.
5. Update the WiFi Driver (Automatic Process)
Updating the WiFi driver is the most practical and easy method that one can perform to fix 5GHz WiFi not showing up in Windows 10 problem. Follow the steps along for the automatic update of WiFi drivers.
First of all, open the Device Manager again.
Now in the Network Adapters option, right-click on the Wireless Adapter and select the Update Driver option.
In the new window, you will have two options. Select the first option, i.e., Search automatically for updated driver software. It will start the driver update.
Now follow the on-screen instructions and when the process is finished, restart your computer. Now you might be able to detect the 5GHz or 5G network on your computer. This method will, most probably, solve the problem of 5GHz WiFi not showing up in Windows 10.
6. Update the WiFi Driver (Manual Process)
In order to update the WiFi driver manually, you will need to download the updated WiFi Driver on your computer beforehand. Go to the manufacturer’s website of your computer or laptop and download the most compatible version of WiFi driver for your system. Now that you have done that follow the given steps:
Follow the first two steps of the previous method and open the driver update window.
Now, instead of selecting the first option, click on the second one, i.e., Browse my computer for driver software option.
Now browse through the folder where you have downloaded the driver and select it. Click Next and follow the further instructions till the process is complete. Now restart your computer to apply the changes and see if the 5GHz band WiFi is enabled this time. If you still cannot detect the 5G band, perform the methods 3 and 4 again to enable the 5GHz support. The download and update of the driver might have disabled the 5GHz WiFi support.
7. Rollback the Driver Update
If you were somehow able to access the 5GHz network before updating the WiFi driver, then you might want to reconsider the update! What we suggest here is to roll back the driver update. The updated version must have some bugs or issues which may hinder the 5GHz network band. To rollback, the driver update, follow the steps below:
Following the above-mentioned steps, open the Device Manager and open the Wireless Adapter Properties window.
Now, go to the Driver tab, and select the Roll Back Driver option and proceed as instructed.
When the rollback is complete, restart your computer and check if it worked. Recommended:
How to Fix Copy Paste not working on Windows 10 Fix Mouse Cursor Disappearing in Google Chrome How to Enable Split-Screen Multitasking on Android 10
We hope this article was helpful and you were able to fix 5GHz WiFi not showing up in Windows 10 issue. If you sill has any queries or suggestions then feel free to reach out using the comment section.


