The only problem with using AHCI mode is that it cannot be changed after the installation of Windows, so you need to set up AHCI mode in BIOS before installing Windows. Fortunately, there is a fix for that, so without wasting any time let’s see How to Enable AHCI Mode in Windows 10 with the help of the below-listed guide.
How to Enable AHCI Mode in Windows 10
Make sure to create a restore point just in case something goes wrong.
How to Enable AHCI Mode in Windows 10 Method 1: Enable AHCI Mode via Registry Method 2: Enable AHCI Mode via CMD Method 3: Enable AHCI Mode by Deleting SatrtOverride
Method 1: Enable AHCI Mode via Registry
1.Press Windows Key + R then type regedit and hit Enter to open Registry Editor.
2.Navigate to the following registry key: HKEY_LOCAL_MACHINE\SYSTEM\CurrentControlSet\Services\iaStorV 3.Select iaStorV then from the right window pane double-click on Start.
4.Change it’s value to 0 and then click OK.
5.Next, expand iaStorV then select StartOverride. 6.Again from the right window pane double-click on 0.
7.Change it’s value to 0 and click OK.
8.Now navigate to the following registry key: HKEY_LOCAL_MACHINE\SYSTEM\CurrentControlSet\Services\storahci 9.Select storahci then in the right window pane double click on Start.
10.Change it’s value to 0 and click OK.
11.Expand storahci then select StartOverride and double-click on 0.
12.Change it’s value to 0 then click OK.
13.From this article boot your PC into Safe mode then without booting it to Windows, boot it to BIOS and enable AHCI mode.
Note: Locate Storage Configuration then change the setting which says “Configure SATA as” and select ACHI mode. 14.Save changes then exit BIOS setup and normally boot your PC. 15.Windows will automatically install AHCI drivers then again restart to save changes.
Method 2: Enable AHCI Mode via CMD
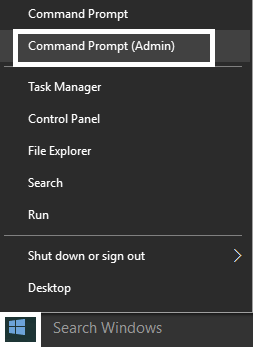
1.Press Windows Key + X then select Command Prompt (Admin).
2.Type the following command into cmd and hit Enter: bcdedit /set {current} safeboot minimal
3.Boot your PC into BIOS and then enable AHCI mode.
4.Save changes then exit BIOS setup and normally boot your PC. Follow this article to boot your PC into Safe mode. 5.In Safe mode, open Command Prompt then type the following command and hit Enter: bcdedit /deletevalue {current} safeboot
6.Restart your PC normally and Windows will automatically install AHCI drivers.
Method 3: Enable AHCI Mode by Deleting SatrtOverride
1.Press Windows Key + R then type regedit and hit Enter.
2.Navigate to the following registry key: HKEY_LOCAL_MACHINE\SYSTEM\CurrentControlSet\Services\storahci 3.Expand storahci then right-click on StartOverride and select Delete.
4.Open Notepad then copy & paste the following text as it is: reg delete “HKEY_LOCAL_MACHINE\SYSTEM\CurrentControlSet\Services\storahci\” /v StartOverride /f 5.Save the file as AHCI.bat (.bat extension is very important) and from Save as type select “All Files“.
6.Now right-click on AHCI.bat and select Run as Administrator. 7.Again restart your PC, enter into BIOS and enable AHCI mode. Recommended:
How to Switch to tablet mode in Windows 10 Windows sockets registry entries required for network connectivity are missing How to Disable Data Logging on Windows 10 Fix High CPU Usage by Service Host: Local System
That’s it you have successfully learned How to Enable AHCI Mode in Windows 10 but if you still have any questions regarding this post then feel free to ask them in the comment’s section.


